Ardor client interface
Introduction
This guide describes the Ardor client interface as of Ardor software release 2.0.14. It assumes that you have already installed the NRS (Ardor Reference Software), opened the client in a browser and logged in, as described in Getting started. For further specific questions and common problems please consult the FAQ pages.
The NRS uses a client-server architecture.
The NRS server is a Java application with two interfaces:
- one for communicating with other servers through the Internet (forming a network of nodes) and
- one for responding to requests from clients through its API (Application Program Interface).
The NRS client, often referred to as the Ardor Wallet, is a browser-based interface to the NRS server (via the API), .
Client Interface Layout
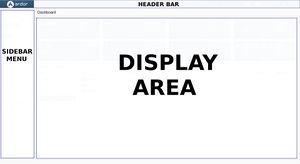
The client window is organized into three main areas:
- The Header Bar (default blue)
- The Sidebar Menu (default light grey)
- The Display Area
The Header Bar
The blue bar at the top of the Ardor client interface is the header bar, with the following buttons available:
| Button | Function |
|---|---|

|
Clicking this button toggles the visibility of the Sidebar Menu. |
| Send ARDR | Clicking this button opens a window to send ARDR to another account. |
| Send Currency | Clicking this button opens a window to send a Monetary system currency to another account. See Transfer a Currency. |
| Send Message | Clicking this button opens a window to send a message to another account. |

|
Clicking this button causes the My Transactions screen to appear in the Display Area, with the Unconfirmed filter selected. The number in the button graphic indicates the current number of unconfirmed transactions associated with the logged-in account. |

|
Clicking this button causes the My Transactions screen to appear in the Display Area, with the Phasing (f) filter selected. The number in the button graphic indicates the current number of pending phased transactions associated with the logged-in account. |

|
Clicking this button causes the drop-down Notifications Menu to appear. The numbers in the button graphic are the numbers of unread notifications of confirmed transactions. The first number is the number of distinct transaction types; the second number is the total number of transactions. |
| Clicking this button causes the Contacts screen to appear in the Display Area. | |

|
Clicking this button causes the drop-down Settings Menu to appear. |
| Clicking this button causes the drop-down Help Menu to appear. | |
| Clicking this button causes the drop-down Logout Menu to appear. |
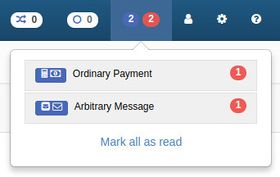
Notifications Menu
|
Each item in the Notifications drop-down menu corresponds to a transaction type, with the number of unread notifications of that type shown in a (default red) circle.
|
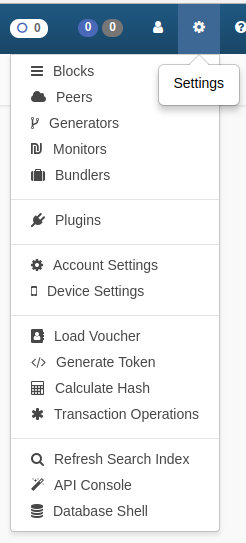
Settings Menu
|
The Settings Menu contains items that cause the following screens to appear in the Display Area:
|
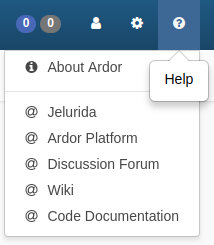
Help Menu
| The Help Menu contains an item that causes the News screen to appear in the Display Area.
|
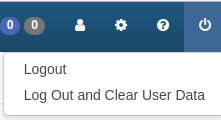
Logout Menu
The Logout Menu contains three logout options:
|
The Sidebar Menu
The top section of the Sidebar contains account-related information and controls. Beneath the account section is the main menu of the client, consisting of buttons which cause various screens to appear in the Display Area. Buttons with a > symbol to the right also make visible submenu items each with a >> symbol to the left.
| No Name Set - Clicking on this will open a window which allows you to assign a name to your account; the assigned name will be shown instead.
|
The Display Area
The following screens can appear in the Display Area. A button labeled >_ can be found in the lower right corner of this area; it opens a Console Logging window which displays the results of API calls made to the NRS server by the client in real-time, useful for debugging, when enabled on the Settings screen.
Dashboard
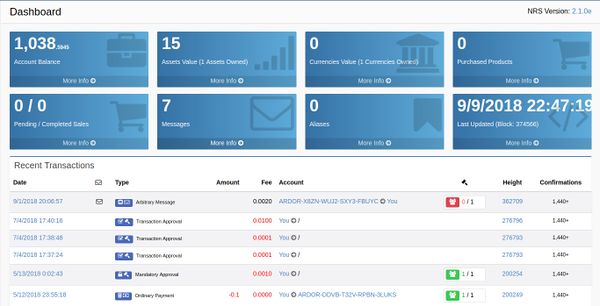
The Dashboard appears in the Display Area when the client starts. It gives an overview of the logged-in account which can require several minutes to become up-to-date after starting the NRS.
NRS Version - The NRS (Ardor Reference Software) version currently running. Clicking on the version number opens the NRS Info window with an NRS State tab displaying system information (after a delay) and an NRS Update tab for checking and updating the NRS version.
Account Balance - The confirmed ARDR balance less any unconfirmed outgoing transactions. Clicking on More Info opens the Account Details window that includes an Account Leasing tab for leasing the forging power of your account to another.
Assets Value - The combined value of all owned assets measured in ARDR. The number of assets owned is indicated in parentheses. Clicking on More Info causes the My Assets screen of the Asset Exchange to appear in the Display Area.
Currencies - The number of currencies owned. Clicking on More Info opens the All Currencies Screen of the Monetary system containing a button for switching to the My Currencies Screen, which displays only the currencies owned.
Purchased Products - The number of products purchased in the Marketplace. Clicking on More Info causes the Purchased Products screen to appear in the Display Area.
Pending / Completed Sales - The number of pending / completed sales in the Marketplace. Clicking on More Info causes the My Pending Orders screen to appear in the Display Area. The My Completed Orders screen can be displayed by clicking the My Completed Orders submenu item under the Marketplace Sidebar Menu item.
Messages - The total number of messages sent and received. Clicking on More Info causes the Messages screen of the Arbitrary_messages System to appear in the Display Area.
Aliases - The number of aliases owned. Clicking on More Info causes the Aliases screen of the Alias_system to appear in the Display Area.
Last Updated - The local time of the most recent block received from the Ardor network. The current height of the blockchain is indicated in parentheses. Clicking on More Info causes the Blocks screen to appear in the Display Area.
Recent Transactions - A list of recent transactions. See the My Transactions screen for more information. Clicking on View More causes the My Transactions screen to appear in the Display Area.
My Transactions
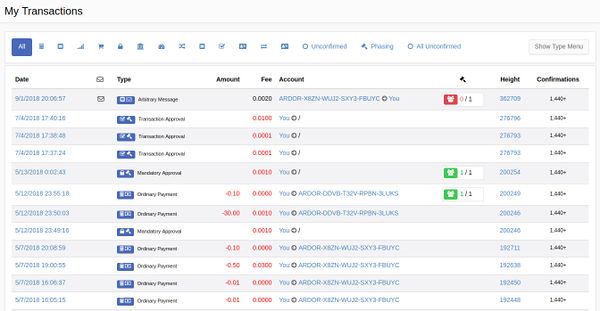
Transactions associated with the logged-in account are displayed in reverse chronological order on this screen. When there are many transactions, they are displayed on multiple pages accessed by the page buttons at the bottom of the screen. The number of displayed transactions can be reduced by filtering them according to transaction type and further according to transaction subtype. Also, pending phased transactions of any type can be displayed, as well as unconfirmed transactions associated with all accounts.
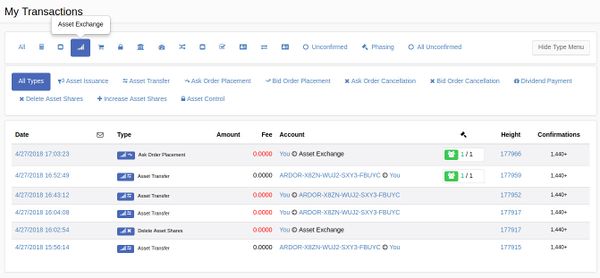
When the screen is first opened from the Sidebar Menu, all transactions are displayed. To filter the transactions, click on one of the graphic symbols in the top row, first hovering the cursor over it to see a descriptive tooltip. For finer filtering, click on the Show Type Menu button to reveal the subtype graphic symbols and text descriptions in the next row. The subtype row displays only the subtypes of the type selected in the top row. If All is selected in the top row, only the All Types graphic appears in the subtype row. An example of filtering is shown below.
Transaction - The transaction timestamp, in local time. Click on it to open the Transaction Info window, which gives transaction details and a list of optional actions related to the transaction.
Envelope - Indicates that the transaction contains a readable message, one that has not been pruned. Click on the transaction timestamp to read the message in the Transaction Info window.
Type - The type/subtype of the transactions with a graphic and text.
Amount - The amount of ARDR that was sent/received. Received ARDR is shown in green, preceded by a plus sign. Sent ARDR is shown in red, preceded by a minus sign.
Fee - All transactions require a fee paid in ARDR. The fee is paid by the initiator of the transaction and as such is shown in red if initiated by the logged-in account, otherwise it is shown in black.
Account - The accounts involved in the transaction, with an arrow showing the direction of the transfer. If no other account is involved, a slash (/) is shown as the recipient. Contact labels are used when available in place of account IDs, but and the logged-in account is always indicated by You. Click on an account label/ID to open the Account Info window, which gives account details and a list of optional actions related to the account.
Gavel - Indicates the phasing poll status of phased transactions.
Conf. - The number of confirmations. A newly created transaction that has not yet been included in the Ardor blockchain is shown as having dash (-) confirmations. When the transaction gets included in the block at the top of the blockchain, the number of confirmations becomes 0. Each block added after that increases the number by one. Ten confirmations is considered safe for small transactions. 720 confirmations is considered safe even for very large transactions, because the blockchain can no longer be reorganized.
Filtering This screen is an example of transaction filtering by the type Messaging/Voting/Aliases (type 1) and further by the subtype Alias Assignment (subtype 1). Click Hide Type Menu to hide the subtype row.
Contacts
Contacts are convenient labels for Ardor accounts, useable when sending ARDR or messages. They are stored in a local database by your browser, not on the blockchain. As such, they can be erased by the Logout and Clear User Data option of the Logout Menu.
This screen lists contacts in alphabetical order along with controls for modifying and deleting them. In the upper right corner of the screen are buttons for opening windows to add a contact to the list or to export/import the entire list to/from a JSON-formatted file.
Name - The contact label. Click on it to open the Update Contact window where the Account ID, Email Address and Description fields can be updated.
Account ID -- The Reed-Solomon address of the account. Click on it to open the Account Info window.
Blocks
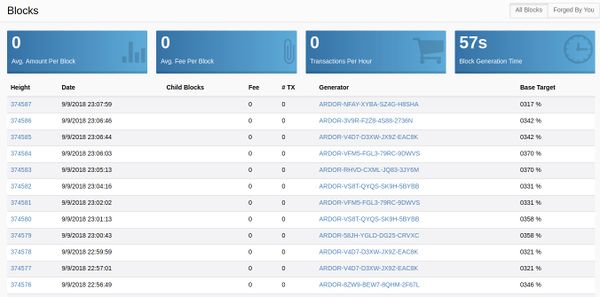
This screen displays information about the Ardor blockchain. The blockchain represents the full history of transactions on the Ardor network, with each block in the chain containing up to 255 transactions. Nodes on the Ardor network compete to create new blocks from unconfirmed transactions through a process called Forging, at a theoretical rate of about one per minute although usually less often in practice.
The (default blue) boxes near the top of the screen display statistics for the blocks listed beneath them in reverse block height order. The page buttons below the list allow older blocks to be viewed. Click on the Forged By You button in the upper right corner to view only those blocks forged by the logged-in account.
]
Height - Block height. Each block in the blockchain is numbered sequentially beginning with zero, so the higher the number, the more recent the block. Click on this number to open the Block Info window, which includes details about the the block and all of the transactions it contains.
Date - The local date and time that the block was generated.
Amount - The total amount of ARDR transferred by transactions in the block, not including fees.
Fee - The total transaction fees in the block, in ARDR. All transaction fees are transferred to the account that generated the block.
# TX - The number of transactions included in the block.
Generator - The ID of the account that generated (forged) the block. This account collects all the fees for this block.
Payload - The combined size of all of the transactions in the block, in bytes.
Base Target - A dynamically adjusted Forging target, designed to maintain an approximately steady rate of block generation. When blocks are generated too frequently, the base target is adjusted smaller by the Ardor network, which makes it less likely that the random numbers computed by each active node every second will be less than the base target multiplied by the node's effective balance. If all existing ARDR were actively forging, the base target would average about 100%. If it averages about 400%, for example, then only about one-fourth of existing ARDR are actively involved in forging.
Peers
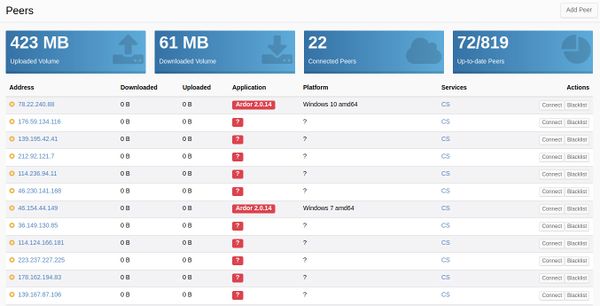
This screen displays information about Ardor network peer nodes connected to the local NRS server.
The (default blue) boxes near the top of the screen display statistics for the peers listed beneath them. Click on the Add Peer button in the upper right corner to add a peer to the list by specifying its address.
If a peer becomes disconnected the (default green) checkmark to the left will change to a (default gold) x. You can attempt reconnection by clicking on the Connect button to the right.
Any peer can be blacklisted by clicking on the Blacklist button. The peer will be disconnected for at least 10 minutes unless manually reconnected by clicking on the Connect button.
Address - The IP address or domain name (if known) of the peer node.
Weight - The weight of a hallmarked peer node.
Downloaded - The amount of data (in bytes) downloaded by the peer node in the current session.
Uploaded - The amount of data (in bytes) uploaded by the peer node in the current session.
Application - The name and version of the server software running on the peer node.
Platform - The platform of the peer node, as specified by the nxt.MyPlatform property in the properties file.
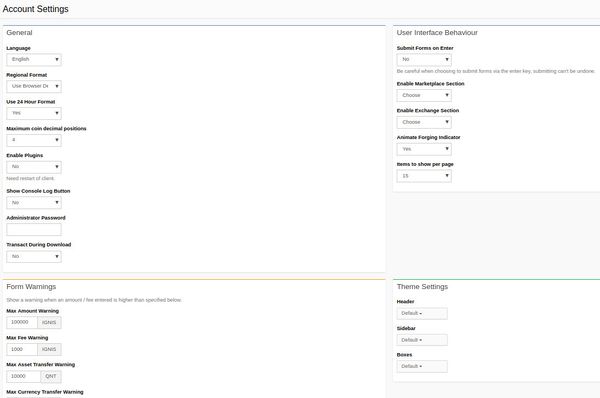
Settings
Settings affect the behavior of the client. They are stored in a local database by your browser, not on the blockchain. As such, they can be reset by the Logout and Clear User Data option of the Logout Menu.

