Asset exchange
Description
This page covers the decentralized Asset Exchange within the Ardor multichain platform. Before jumping into the details, we can start with an example that shows one of the possible uses of this feature.
In the words of BCNext (developer of the Nxt blockchain):
|
Accessing the Asset Exchange
Ardor has the decentralized asset exchange feature since its deployment in production (the 1st of January of 2018) If you do not know how to install the Ardor client, check out the getting started page or the common problems and resolutions page in case you are having problems.
The Interface
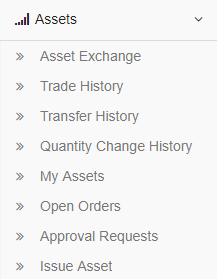
With the server running, access the Ardor interface of your client by visiting http://localhost:27876/ (or https://localhost:27876/ if you have enabled SSL). On the sidebar, select a child chain that has the asset exchange enabled (e.g.: Ignins), click the menu Asset Exchange, this will give you access to the following options:
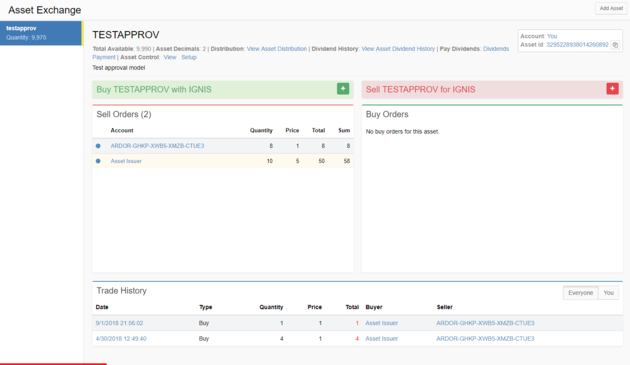
| Asset Exchange: This tab gives you access to the Asset Exchange itself. To observe an asset click the "Add asset" button and enter either the Asset ID or ID of the issuing account. Assets of your interest will be listed on the left. By selecting an asset, further information is provided: a description, buy and sell orders, the quantity, etc. |
| Trade History: This page will list all the assets traded by your account: both those bought by you and those you sold from the exchange. |
| Transfer History: This page will list all the assets transferred and received by your account. |
| Quantity Change History: This page will list the quantity change history of your assets. |
| My Assets: This page will list all the assets in your possession: both those issued by you and those you bought from the exchange. |
| Open Orders: Here is provided a list of all your orders, notably the assets you are either trying to sell or to buy. It also allows you to cancel them. |
| Approval Request: Approval request for transactions related to your assets, see Asset control |
| Issue Asset: A window will pop up allowing you to issue your own assets into the exchange. |
By default, the Asset Exchange does not list any assets. You will have therefore to add the assets (using the Add Asset button) you are interested in, manually, yourself. For this purpose websites that rank the assets in meaningful ways (by volume, by the number of trades, etc) and that offer specific filters are starting to appear. In the future, you will be able to load asset lists in bulk instead of having to load them one by one. If you find yourself on the page of an asset, a Bookmark this Asset button will appear that will allow you to keep track of it.
Remind always to check that the asset id you are adding correspond with the legit asset:
- Asset names are not unique, asset ids are unique
Note: you can only add assets to the list if you are using the browser in normal mode. If you are in incognito (or equivalent) then any added list will disappear once you close the browser window. In the future, more portable systems will be implemented.
| This is the main menu for the Asset Exchange, it is fundamentally organized in two areas. |
|
| If you own tokens for an asset, it will appear in yellow on the side list. |
| By selecting an asset, the interface area will automatically display the corresponding information. This includes the amount of tokens that have been created ("quantity"), how divisible is the token ("asset decimals"), a brief description of the asset, who created the asset ("account") and the asset identifier ("asset ID"). These informations are crucial, in fact the asset names are non-unique'. What this means is that there can be multiple assets that have the same name. |
| The cost of issuing an asset will be charged in child-chain tokens corresponding value of 100 Ardor, see Create Transaction Request should discourage people from spamming the exchange with assets whose only purpose is confusion and abuse. Without entering this worst-case scenario, it is reasonable to assume that perfectly legit users may create assets of the same name. Therefore a good degree of vigilance before buying is always beneficial. |
| To buy an asset, follow these simple steps: |
|
In this menu all your confirmed assets will be displayed, this includes the assets you issued and those you obtained through trading.
Transfer asset
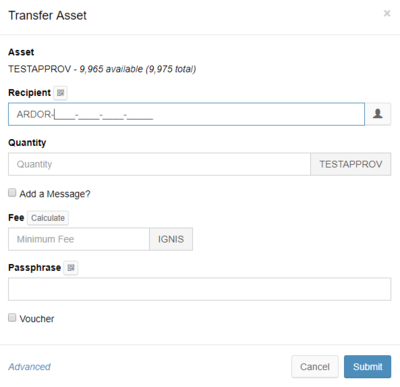
Assets are also transferable, the procedure is very simple:
- Under My Assets, find the asset you wish to transfer.
- Click transfer.
- Complete the fields as follows.
| RECIPIENT: the account you wish to transfer the assets to. | |
| Constraints: | |
| |
| COMMENT: you can attach a brief commentary to the transfer. when marking "Add a message" | |
| Constraints: | |
| |
| |
| QUANTITY: specify the amount of assets you wish to transfer. | |
| Constraints: | |
| |
| |
| FEE: set the fee you are willing to pay for the transaction. | |
| Constraints: | |
| |
| |
| SECRET PASSPHRASE: enter your passphrase. | |
| Constraints: | |
|
|
| VOUCHER: see Transaction Voucher. | |
| Constraints: | |
| |
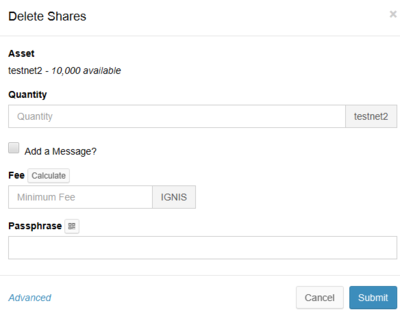
The asset issuer can delete assets shares, the procedure is very simple:
- Under My Assets, find the asset you wish to delete shares.
- Click Delete Shares.
- Complete the fields as follows.
| QUANTITY: specify the amount of shares you wish to delete. | |
| Constraints: | |
| |
| COMMENT: you can attach a brief commentary to the transfer. when marking "Add a message" | |
| Constraints: | |
| |
| |
| FEE: set the fee you are willing to pay for the transaction. | |
| Constraints: | |
| |
| |
| SECRET PASSPHRASE: enter your passphrase. | |
| Constraints: | |
|
|
| VOUCHER: see Transaction Voucher. | |
| Constraints: | |
| |
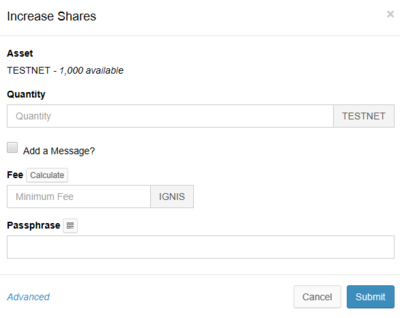
The asset issuer can increase assets shares, the procedure is very simple:
- Under My Assets, find the asset you wish to increase shares.
- Click Increase Shares.
- Complete the fields as follows.
| QUANTITY: specify the amount of shares you wish to increase. | |
| Constraints: | |
| |
| COMMENT: you can attach a brief commentary to the transfer. when marking "Add a message" | |
| Constraints: | |
| |
| |
| FEE: set the fee you are willing to pay for the transaction. | |
| Constraints: | |
| |
| |
| SECRET PASSPHRASE: enter your passphrase. | |
| Constraints: | |
|
|
| VOUCHER: see Transaction Voucher. | |
| Constraints: | |
| |
Under this menu you can see all your orders that are currently open.
What to keep in mind:
- You can cancel any order you made. However
- The process is not instantaneous. Your cancel order is broadcasted to the network, your order may get accepted before you can manage to cancel it.
- The process of canceling an order is a transaction, meaning it involves a fee of 0.01 Tokens, see: fees.
- An order in the process of being canceled will appear in red under your Open Orders menu.
- In this image, the sell order I am willing to sell the shares (5 IGnis).
- The TESTAPPROV asset refers to an asset named TESTAPPROV, whose ID is 14572747084550678873, and that has been created by me.
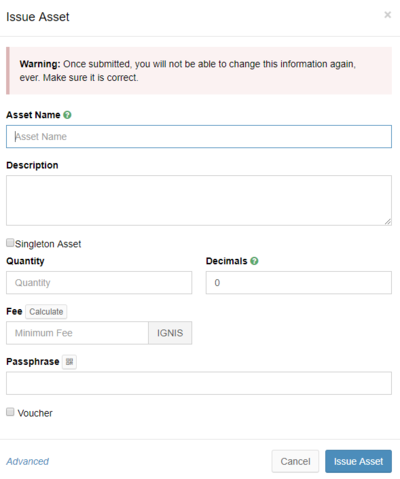
Under this menu, you can issue assets yourself. These will be publicly available on the Asset Exchange where they can be traded for Ignis and vice-versa.
The following window will pop up:
NOTE: as the warning mentions, when you issue your asset you will not be able to modify any of the fields, ever. The reason why it is imperative to make sure all the information entered is correct.
| ASSET NAME: the name of the asset you intend to issue. This is also the name announced to other traders, allowing them to find this asset. |
| Constraints: |
|
|
|
|
| DESCRIPTION: in this field, you can briefly describe the asset being issued. |
| Constraints: |
|
|
| QUANTITY: specify how many tokens you intend to create. |
| Constraints: |
|
|
| DECIMALS: this field defines the divisibility of the token. As an example, by defining 2 decimals, the minimum amount of tokens you can sell or buy is 0.01. |
| Constraints: |
|
|
| FEE: define the fee related to issuing the asset. To avoid spam on the Asset Exchange, the IGNIS equivalent of 100 ARDR are the minimum required to issue an asset. |
| Constraints: |
|
| DEADLINE: how long you are willing to wait before the request gets automatically deleted. |
| Constraints: |
|
|
| PASSPHRASE: the asset belongs to the person issuing it. Therefore it is required to enter your own passphrase. It will not be broadcasted. |
|
| Constraints: |
|
| VOUCHER: see Transaction Voucher. |
| Constraints: |
|
FAQ
See more:

