Android Full Node
The Ardor blockchain platform has released a software package to support full forging and validating nodes on devices running Android 8 or higher. The following page provides guidance on how to download, install, and utilize this new package.
Please note an Android-specific user-interface has been developed for initializing new nodes on the Ardor network; however, all processes related to account creation and utilizing the broader features of the platform require navigating to the web wallet by clicking "Open Wallet." This Android-specific interface is only for managing the forging and/or validating the status of your device.
Downloading and installing the Android OS package
Go to https://www.jelurida.com/ardor/downloads and download "Android client". It is a combined Android client, containing both "Full Node" and "Light Client". Open the downloaded APK file. You will be warned that this is an "unknown app":
Press "Continue" and then proceed with the installation. On completion you should see the "Ardor Server" launcher like any other app on the device:
Tapping on it opens the Start server screen
Note: if the device features a battery optimizer, the server process will be suspended when the screen is off. To run properly, you need to remove Ardor Server from optimized apps and allow it to run in background.
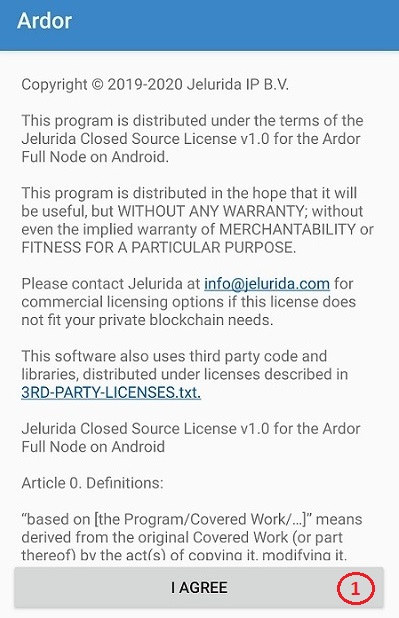
Jelurida License screen
In the first launch of the application, you will be greeted with the Jelurida Closed Source License screen. Please read it carefully, before agreeing and continuing further.
- Press the 'I agree' button, when you have read the Jelurida Closed Source License text.
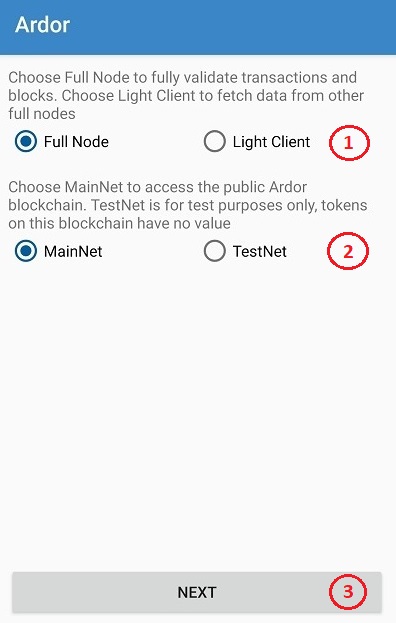
Node Configuration screen on first launch
- Options to select between "Full Node" and "Light Client". Available only on the first launch of the application.
- Options to select between "MainNet" and "TestNet". Available only on the first launch of the application.
- Continue to next menu
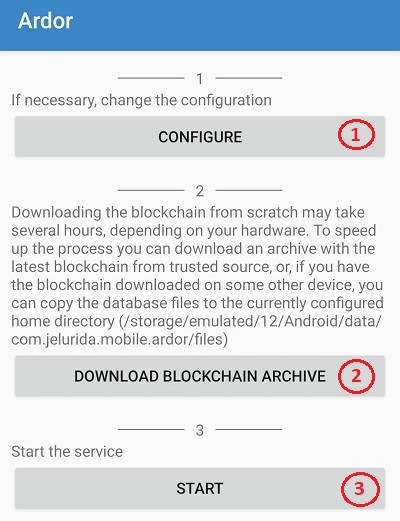
Start server screen
- "CONFIGURE" button opens the node Configuration Menu. It is recommended to review the configuration at first start.
- "DOWNLOAD BLOCKCHAIN ARCHIVE" is an optional tool for downloading an archive of the blockchain database from a trusted Jelurida source. This button is available only when operating on Full Node, if the server was never previously started or there is no blockchain database loaded. The current database can be stashed or deleted through the Blockchain database section in configuration.
- "START" starts the Ardor server.
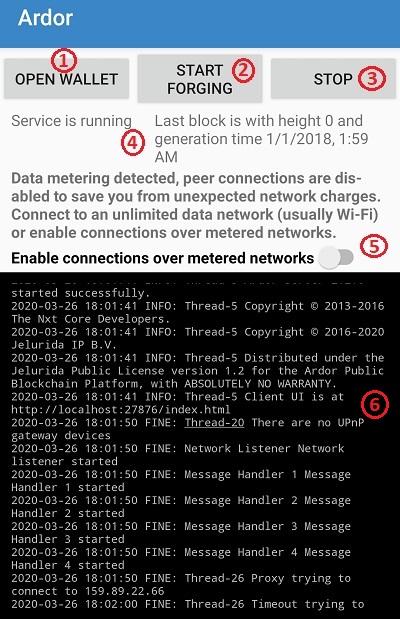
Main control screen
- "OPEN WALLET" opens the Ardor user interface in your browser.
- "FORGING" opens the Forging utility interface. Available only on Full Node.
- "STOP" stops the server.
- Server status is shown here
- If the server is started over a metered data network, a warning text will appear to inform the user, along with a button, giving the user option to enable connections over metered networks.
- Latest server log is displayed here. The text box is selectable, so the log can be copied. The log is auto-scrolled if the cursor is at the end of the text.
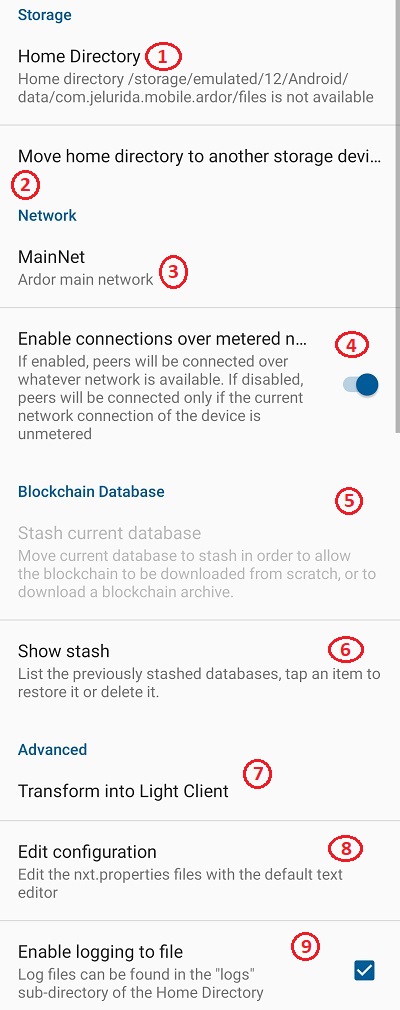
Storage
- "Ardor Home Directory" allows you to choose the storage device where the database, configuration, logs, and other files will be stored.
- "Move home directory to another storage device" allows you to move the home directory to another storage device (ex. sd card).
Network
- Select the network in which the client will operate - MainNet or TestNet.
- "Enable connections over metered network" - configures the node to disable all networking in case the device is currently connected over metered connection.
Blockchain Database (Full Node)
Utilities for managing the blockchain database files. These files are in the home directory (see Storage) and can also be moved/copied with an external file explorer.
- "Stash current database". The current database is in the directory
<home>/files/nxt_dbfor MainNet or<home>/files/nxt_test_dbfor TestNet. With this button, the database will be moved to a special stash folder, so that a new database can be placed as "current". - "Show stash" - lists the previously stashed databases and allows them to be restored as "current" or deleted to save space.
Advanced
- "Transform into "Light Client/Full Node" enables to switch the client between "Light Client" and "Full Node".
- "Edit configuration" opens an external text editor for editing the
nxt.propertiesfile. Full documentation of the properties is available on the Nxt-default_properties_configuration_file page. - "Enable logging to file" - logging to file can be disabled to reduce the number of file system writes and save some space in case the node is going to run for long periods of time.
Forging utility (Full Node)
The forging utility allows the secret phrase(s) of the forging account(s) to be stored in a password-encrypted file in the internal file storage of the Android app. This allows it to be loaded from there on each start instead of manually entered.
Note: For security reasons, it is recommended to use the Ardor Balance Leasing and store the secret phrases of the account to which the balance is leased, and which doesn't contain a significant amount of funds.
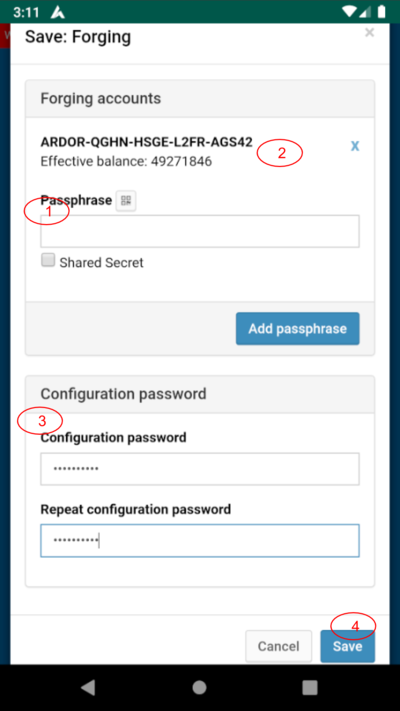
Save Forging Secrets Screen (Full Node)
This screen opens automatically if the forging utility wasn't used before.
- Type a forging account secret phrase or use the barcode scanner button. Tap "Add passphrase" when ready.
- The account IDs of the previously entered forging secrets are displayed here with their effective balances. The secrets can be removed with the "X" button.
- Type and repeat the configuration password. This is the password with which the file will be encrypted. Do not use your account's secret passphrase - you should create your own unique password. This password must be entered every time forging is started.
- Press "Save".
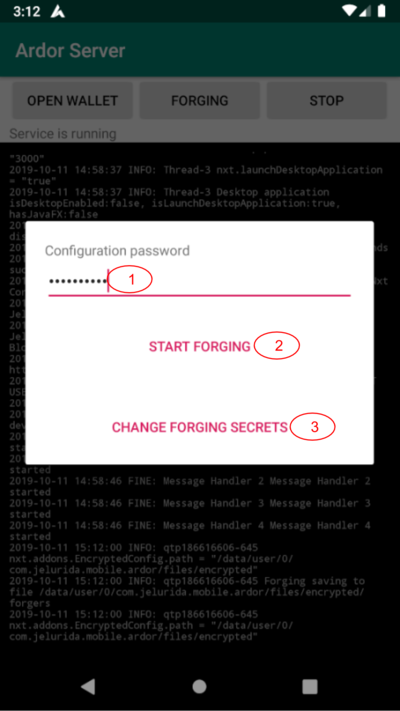
Start Forging Dialog (Full Node)
This dialog appears if there is a file with forging secrets in the internal storage of the app.
- The password which was previously used to encrypt the file with the secret phrase(s).
- Tap this to decrypt the file and start forging.
- Opens the Save Forging Secrets Screen in order to create a new encrypted file with forging secrets.


