How to Offline Transaction Signing
Introduction
Each transaction in the Ardor blockchain is digitally signed to verify that someone who knows the secret passphrase of the originating account authorized the transaction. For enhanced security, the Ardor client interface supports offline transaction signing, the purpose of which is to protect the secret passphrase from exposure to the Internet. This guide documents the procedure involved and is based on Ardor software release 2.1.0e.
Prerequisites
Two computer systems are required, both with Java and NRS (Ardor Reference Software) installed:
- An online system with an updated blockchain for creating an unsigned transaction, and for later broadcasting the signed transaction to other nodes in the Ardor network. This system can be a local node or a remote public node accessed with only the public account ID, not the secret passphrase.
- An offline system without an Internet connection and no need for an updated blockchain, for signing the transaction using the secret passphrase. The nxt.isOffline=true property setting can be used on the offline system to make sure it doesn't even try to connect to peers or to listen on the peer port.
Procedure
Create an Unsigned Transaction on the Online System
Prepare the Transaction
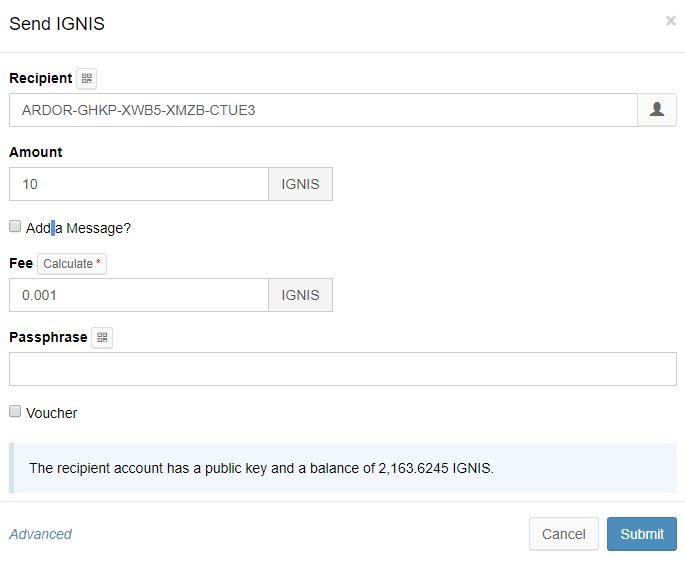
In the Ardor client, transactions are prepared using a pop-up (modal) entry form. For example, to send 10 IGNIS to the account ARDOR-GHKP-XWB5-XMZB-CTUE3, the form looks like this:
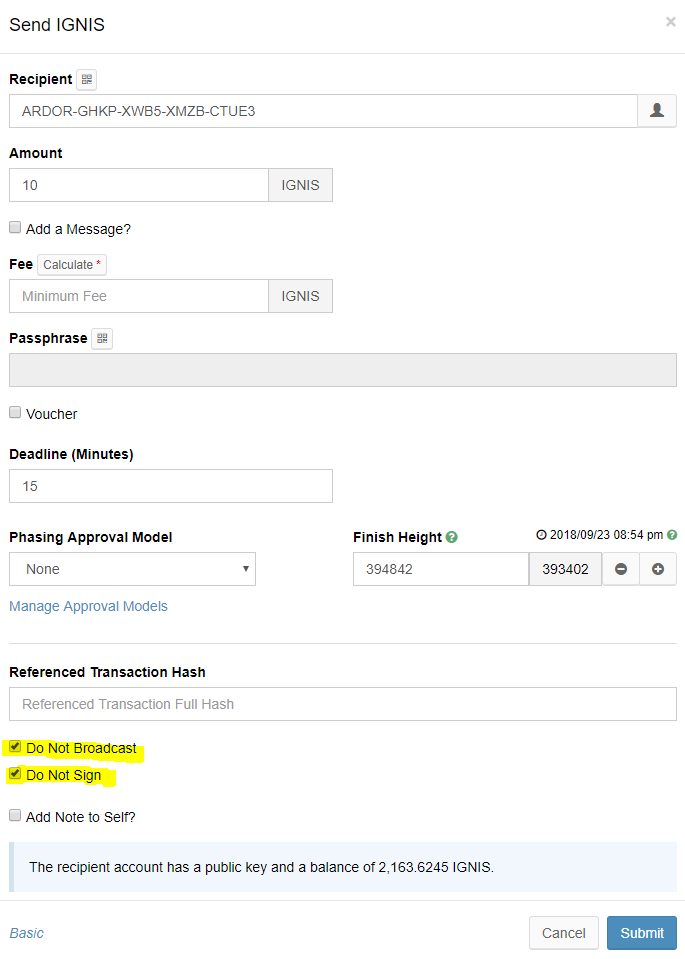
- If the advanced blue link in the lower left is clicked, the form expands like this:
- This form has a check box labeled Do Not Broadcast and if clicked another check box appears labeled Do Not Sign, as shown surrounded by red above.
- If Do Not Sign is also clicked, the Passphrase field is disabled and shaded. If the public key of the account has not yet been submitted to the blockchain, a Public Key field appears just below the checkboxes. Providing the public key ensures that no other secret passphrase corresponding to the same account ID can be used to sign transactions for this account, once this new transaction is confirmed.
- Check both boxes, then click Send Submit to create an unsigned transaction, which appears in a new pop-up window (modal) shown in the next section.
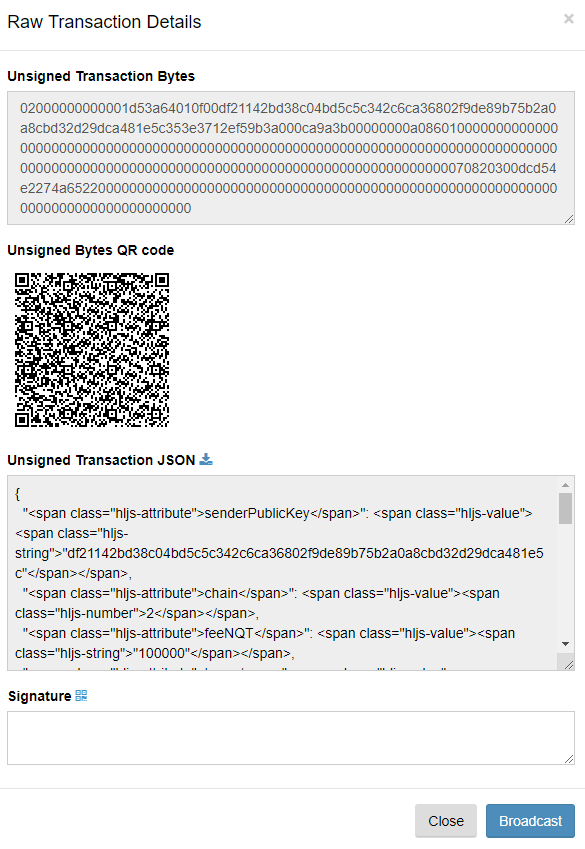
Raw Transaction Details
- If a Signature is provided in the entry field at the bottom of the modal and the Broadcast button is clicked, the transaction will be signed and broadcast to the Ardor network.
- The next step is to transfer the unsigned transaction to the offline system where a signature can be generated, using either the Unsigned Transaction Bytes or the corresponding Unsigned Bytes QR Code at the top of the modal, or the Unsigned Transaction JSON just below the QR code, as explained in the next section. The procedure varies depending upon which of these items is transferred.
- If there is an encrypted message attached to the transaction, neither the transaction bytes and corresponding QR code nor the Signature field will appear because the message cannot be encrypted without the secret passphrase. In this case, the JSON form of the unsigned transaction, which contains the unencrypted message, must be used instead.
- It is always possible to use the JSON form. The QR code is only available if the unsigned bytes form can be used, when there is no encrypted message attachment.
Transfer to the Offline System
To prepare the offline system for the transfer of the unsigned transaction:
- Start the Ardor software on the offline system, logging in with the secret passphrase if desired.
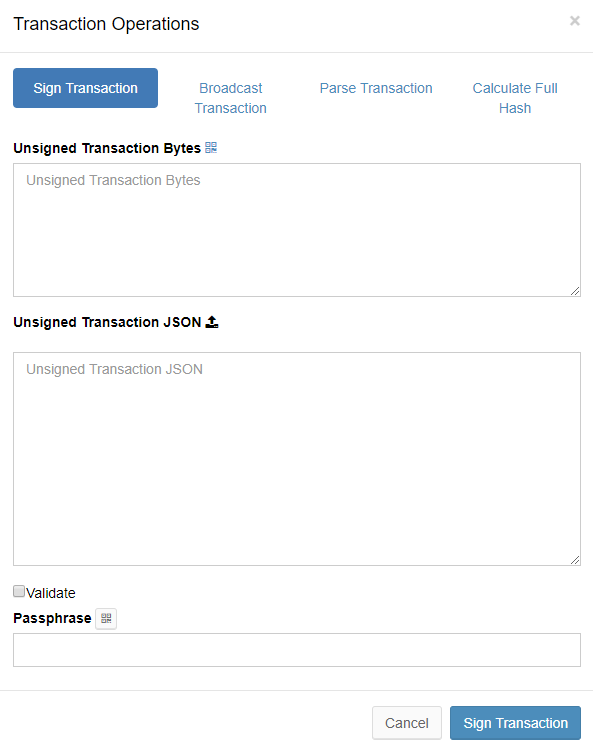
- Navigate to the Sign Transaction tab of the Transaction Operations pop-up entry form (modal) accessible from the drop-down Settings menu (the gear graphic on the right side of the header bar), as shown below:
- Choose one of the following transfer procedures:
Transfer using a USB Flash Drive
- Referring to the Raw Transaction Details pop-up window (modal) in the Raw Transaction Details section above, locate the small blue download graphic just to the right of Unsigned Transaction JSON then click on it to save the JSON to a file on the online hard disk. Alternatively, copy/paste the JSON into a new file.
- Copy the JSON file to a clean USB flash drive (memory stick) plugged into the online system.
- Unplug the USB flash drive from the online system then plug it into the offline system.
- Copy the JSON file from the USB flash drive to the offline hard disk.
- Referring to the Transaction Operations / Sign Transaction pop-up entry form in the Transfer to the Offline System section above, locate the small black upload graphic just to the right of Unsigned Transaction JSON then click on it to upload the JSON from the offline system hard disk. Alternatively, open the JSON file and copy/paste the contents into the Unsigned Transaction JSON field.
Transfer Using a QR Code
- Referring to the Raw Transaction Details pop-up entry form on the online system, shown in the Raw Transaction Details section, photograph the unsigned bytes QR code.
- Referring to the Transaction Operations / Sign Transaction pop-up entry form on the offline system, shown in the Transfer to the Offline System section, click on the graphic just to the right of Unsigned Transaction Bytes to activate the offline webcam. A live video image will appear just below the Unsigned Transaction Bytes field.
- Present the photograph of the QR code to the offline webcam so that it can scan in the QR code. Use the video image to position the QR code until it is recognized and scanned text appears in the Unsigned Transaction Bytes field.
- The video image must have high resolution to recognize the QR code because the pattern contains small details — it represents a large amount of information.
- It may be possible to scan the QR code directly from the video display of the online system, eliminating the need for an intermediary photograph. This is preferable because resolution is lost in the intermediate step.
- If the QR code is not recognized, the Unsigned Transaction Bytes can be copied/pasted into a file on the online system, transfered to the offline system using a USB flash drive, then pasted into the Unsigned Transaction Bytes field on the offline system.
Sign the Transaction on the Offline System
- Refer to the Transaction Operations / Sign Transaction pop-up entry form in the Transfer to the Offline System section above, with the unsigned transaction entered into either the Unsigned Transaction Bytes field or the Unsigned transaction JSON field.
- Enter the secret Passphrase in the field provided, unless you logged in with your secret passphrase and checked Remember passphrase during session, in which case this field is absent.
- Do not check Validate unless the blockchain is updated, which is unlikely on the offline system, because there is no point in checking that the account balance is sufficient to support the transaction. The transaction was already validated when created and will be validated again when broadcast.
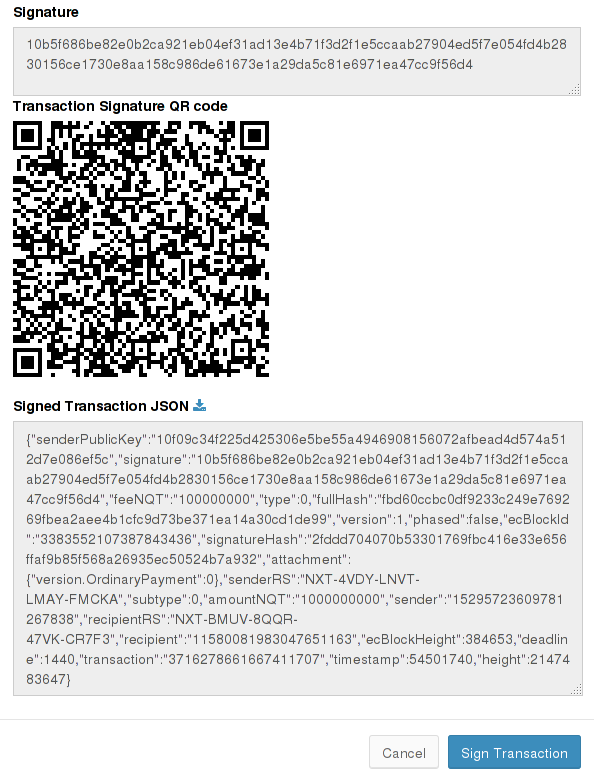
- Click on the blue Sign Transaction button in the lower right of the form. Three new items appear at the bottom of the form:
- Any one of the three new items Signature or its corresponding Transaction Signature QR code, or Transaction Signature JSON can be used on the online system to broadcast the transaction.
- The next step is to transfer one of these items back to the online system, as explained in the next section. The procedure varies depending on which of these items is transferred.
Transfer back to the Online System
Transfer back using a USB Flash Drive
- Referring to the lower part of the Transaction Operations / Sign Transaction pop-up entry form in the Sign the Transaction on the Offline System section above, locate the small blue download graphic just to the right of Signed Transaction JSON then click on it to save the JSON to a file on the offline hard disk. Alternatively, copy/paste the JSON into a new file.
- Copy the JSON file to the USB flash drive still plugged into the offline system.
- Unplug the USB flash drive from the offline system then plug it into the online system.
- Copy the JSON file from the USB flash drive to the online hard disk.
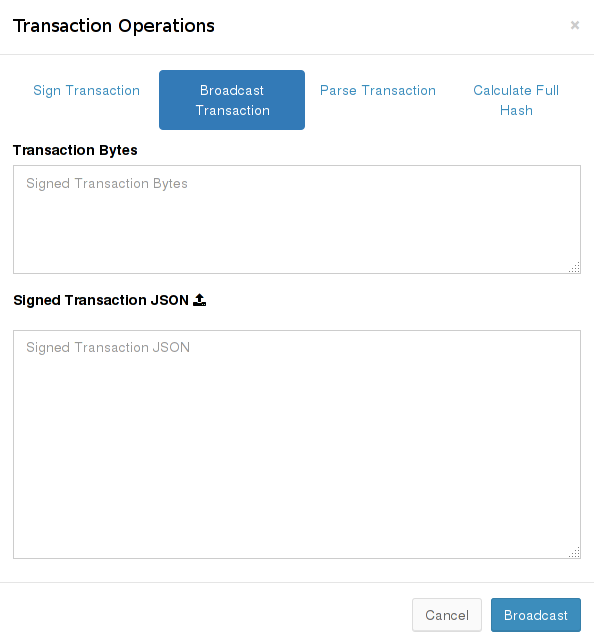
- On the online system, navigate to the Broadcast Transaction tab of the Transaction Operations pop-up entry form (modal) accessible from the drop-down Settings menu (the gear graphic on the right side of the header bar), as shown below.
- Locate the small blue upload graphic just to the right of Signed Transaction JSON then click on it to upload the JSON from the online hard disk into the Signed Transaction JSON field. Alternatively, open the JSON file and copy/paste the JSON into this field.
Transfer back using a QR Code
- Referring to the lower part of the Transaction Operations / Sign Transaction pop-up entry form on the offline system, shown in the Sign the Transaction on the Offline System section, photograph the Transaction Signature QR code.
- Referring to the Raw Transaction Details pop-up entry form on the online system, shown in the Raw Transaction Details section, click on the graphic just to the right of Signature to activate the online webcam. A live video image will appear just below the Signature field.
- Present the photograph of the QR code to the online webcam so that it can scan in the QR code. Use the video image to position the QR code until it is recognized and scanned text appears in the Signature field.
- The video image must have high resolution to recognize the QR code because the pattern contains small details — it represents a large amount of information.
- It may be possible to scan the QR code directly from the video display of the offline system, eliminating the need for an intermediary photograph. This is preferable because resolution is lost in the intermediate step.
- If the QR code is not recognized, the Signature can be copied/pasted into a file on the offline system, transfered to the online system using a USB flash drive, then pasted into the Signature field on the online system.
Broadcast the Transaction on the Online System
The last step in the procedure is to click the blue Broadcast button on the online system.
- If you transferred the signed transaction JSON back to the online system, the Broadcast button is in the lower right of the Transaction Operations / Broadcast Transaction pop-up entry form shown in the Transfer back using a USB Flash Drive section.
- If you transferred the QR code of the signature back to the online system, the Broadcast button is in the lower right of the Raw Transaction Details pop-up entry form shown in the Raw Transaction Details section.

